on
[Spring] Setup data-jpa, flyway on spring-boot2 with kotlin
Setup data-jpa, flyway on spring-boot2 with kotlin
1. Setup data-jpa
1. build.gradle
dependencies {
	...
	compile("org.springframework.boot:spring-boot-starter-data-jpa")
	compile("mysql:mysql-connector-java:5.1.46")
	...
}
2. entity class
@Entity
@Table(name = "users")
data class User(@Id @GeneratedValue(strategy = GenerationType.IDENTITY) @Column(name = "id") val id: Long,
                @Column(name = "name", nullable = false) val name: String,
                @Column(name = "phoneNumber", nullable = false) val phoneNumber: String
)
참고사항
org.springframework.orm.jpa.JpaSystemException: No default constructor for entity:
코틀린으로 data entity를 만드는 과정에서 아무 설정도 하지 않으면 에러가 발생하게된다.
그 이유는 Entity를 만들 때 default constructor가 필요한데 코틀린은 기본값을 다 지정해야 default constructor를 이용할 수 있다.
매번 기본 값을 채우기 번거롭기 떄문에 ‘kotlin-noarg’ 를 이용할 것이다.
build.gradle
buildscript {
	ext {
		kotlinVersion = '1.2.30'
	}
	dependencies {
		classpath("org.jetbrains.kotlin:kotlin-noarg:${kotlinVersion}")
	}
	...
}

apply plugin: "kotlin-jpa"
‘kotlin-jpa’를 추가해주면 jpa에 필요한 noarg 옵션들을 다 추가해준다.
3. Repository
interface UserRepository : JpaRepository<User, Long>
4. Config
@Configuration
@EnableJpaRepositories(basePackages = ["com.qoo.spring5kotlinreactjs"])
class JpaDatabaseConfig
5. application.properties
## Spring DATASOURCE (DataSourceAutoConfiguration & DataSourceProperties)
spring.datasource.url=jdbc:mysql://localhost:3306/spring_kotlin_example
spring.datasource.username=root
spring.datasource.password=

## Hibernate Properties
# The SQL dialect makes Hibernate generate better SQL for the chosen database
spring.jpa.properties.hibernate.dialect=org.hibernate.dialect.MySQL5InnoDBDialect

## This is important
# Hibernate ddl auto (create, create-drop, validate, update)
spring.jpa.hibernate.ddl-auto=validate
spring.jpa.hibernate.naming.physical-strategy=org.hibernate.boot.model.naming.PhysicalNamingStrategyStandardImpl
spring.jpa.hibernate.naming.implicit-strategy=org.hibernate.boot.model.naming.ImplicitNamingStrategyLegacyJpaImpl
6. test
1. make handler
@Service
class UserApiHandler(val userRepository: UserRepository) {

    fun handleGetUserList(request: ServerRequest): Mono<ServerResponse> =
            ok().json()
                    .body(Flux.fromIterable(userRepository.findAll()), User::class.java)

    fun handleGetById(request: ServerRequest): Mono<ServerResponse> =
            ok().json()
                    .body(Mono.justOrEmpty(userRepository.findById(request.pathVariable("id").toLong())), User::class.java)
}
2. make router config
@Configuration
class AppRoutes {

    @Bean
    fun apiRouter(userApiHandler: UserApiHandler) = router {
        (accept(MediaType.APPLICATION_JSON_UTF8) and "/api").nest {
            GET("/users", userApiHandler::handleGetUserList)
            GET("/users/{id}", userApiHandler::handleGetById)
        }
    }
}
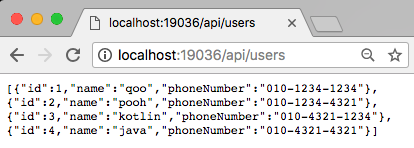
3. results
1. list api

1. get one api

2. Setup flyway
1. build.gradle
dependencies {
	...
	compile("org.flywaydb:flyway-core:5.0.7")
	...
}
2. application.properties
spring.flyway.url=jdbc:mysql://localhost:3306/spring_kotlin_example
spring.flyway.enabled=true
spring.flyway.encoding=UTF-8
spring.flyway.user=root
spring.flyway.password=
spring.flyway.baseline-on-migrate=true
3. add sql files
V1__init_tables.sql
CREATE TABLE `spring_kotlin_example`.`users` (
  `id` BIGINT(20) NOT NULL AUTO_INCREMENT,
  `name` VARCHAR(100) NOT NULL,
  `phoneNumber` VARCHAR(100) NOT NULL,
  PRIMARY KEY (`id`));

INSERT INTO `spring_kotlin_example`.`users` (`name`, `phoneNumber`) VALUES ('qoo', '010-1234-1234');
V2__insert_dummy_data.sql
SELECT @UserId := max(id) FROM `spring_kotlin_example`.`users`;

INSERT INTO `spring_kotlin_example`.`users` (`id`, `name`, `phoneNumber`) VALUES ((@UserId := @UserId + 1), 'pooh', '010-1234-4321');
INSERT INTO `spring_kotlin_example`.`users` (`id`, `name`, `phoneNumber`) VALUES ((@UserId := @UserId + 1), 'kotlin', '010-4321-1234');
INSERT INTO `spring_kotlin_example`.`users` (`id`, `name`, `phoneNumber`) VALUES ((@UserId := @UserId + 1), 'java', '010-4321-4321');
이 파일들은 resources/db.migration 에 넣어줘야한다. 그 후 bootRun 을하게되면 자동으로 서버를 구동하기 전에 flyway가 작동한다.
해당 예제 코드
3. Reactive programming
사실상 위와같이 코드를 작성한다고 해도 사실상 Reactive 한 코드를 작성할 수 없다.
the-reactive-manifesto 를 보면 특히 message driven 방식으로 구현되어야 한다는 것은 비동기식 통신 방법에 아주 중요하다.
하지만 JDBC는 호출을 할 때마다 스레드를 차단하는 블로킹방식으로 구현되어있습니다.
생각해보면 트렌젝션의 개념은 reactive 개념에서 자연스럽게 맞지 않는것을 알 수 있습니다. reactive programming 을 하면서 피하고싶은 리소스를 차단하는 것이기 때문입니다.
Transaction 관리를 하기는 쉽지않지만 spring-5-webflux-and-jdbc-to-block-or-not-to-block 여기서 소개한 방법을 참고해서 위의 코드에서 이어서 실습을 해보려고 한다.
1. DataSourceHikariProperties
@ConfigurationProperties(prefix = "spring.datasource.hikari")
class DataSourceHikariProperties(var maximumPoolSize: Int)
noarg option - build.gradle
noArg {
    annotation("org.springframework.boot.context.properties.ConfigurationProperties")
}
ConfigurationProperties 에도 default constructor 가 필요하기 때문에 기본값을 매번주기 귀찮아서 설정했다.
application.properties
spring.datasource.hikari.maximum-pool-size=5
connection size와 동일하게 잡아준다.
2. JpaDatabaseConfig
@Configuration
@EnableConfigurationProperties(DataSourceHikariProperties::class)
@EnableJpaRepositories(basePackages = ["com.qoo.spring5kotlinreactjs"])
class JpaDatabaseConfig {

    @Autowired
    lateinit var dataSourceHikariProperties: DataSourceHikariProperties

    @Bean
    fun jdbcScheduler(): Scheduler {
        return Schedulers.fromExecutor(Executors.newFixedThreadPool(dataSourceHikariProperties.maximumPoolSize))
    }
}
3. JpaAsyncUtils
@Service
class JdbcAsyncUtils(val scheduler: Scheduler) {
    fun <T> asyncFlux(function: () -> Flux<T>): Flux<T> = Flux.defer(function).subscribeOn(scheduler)
    fun <T> asyncMono(function: () -> Mono<T>): Mono<T> = Mono.defer(function).subscribeOn(scheduler)
    fun <T> asyncMono(callable: Callable<T>): Mono<T> = Mono.fromCallable(callable).publishOn(scheduler)
}
4. UserService
@Service
class UserService(val jdbcAsyncUtils: JdbcAsyncUtils, val userRepository: UserRepository) {
    fun list(): Flux<User> = jdbcAsyncUtils.asyncFlux({ Flux.fromIterable(userRepository.findAll()) })
    fun getById(id: Long): Mono<User> = jdbcAsyncUtils.asyncMono({Mono.justOrEmpty(userRepository.findById(id))})
//    fun getById(id: Long): Mono<User> = jdbcAsyncUtils.asyncMono(Callable<User> { userRepository.findById(id).orElse(null) })
}